
Who is online?
In total there are 4 users online :: 0 Registered, 0 Hidden and 4 Guests None
Most users ever online was 50 on Fri Feb 02, 2024 6:33 am
Latest topics
Making Your Own Network Cables
Page 1 of 1
![]()
 Making Your Own Network Cables
![]() somindradilruk Thu Nov 27, 2008 10:47 pm
somindradilruk Thu Nov 27, 2008 10:47 pm
No matter whether you're putting together a small home network, or maintaining a major network in your office, you'll need network cables. The most commonly used type is Category 5 (short: Cat5), which supports speeds up to 100 Mb/s (Megabits per second). You can either go buy Cat 5 cable in the store, or you can make it yourself.
If you decide to buy it in the store, you'll pay a premium price for the convenience, but if you only need 2 or three cables and don't foresee the need for more in the near future, or need a lot of cables right away and don't have the time to make them yourself, then this is probably the way to go.
If you decide to make your own Cat 5 cable, you'll save a lot of money in the long run, as buying rolls of cable, a baggie of RJ-45 connectors, and the necessary tools will be a lot cheaper and pay for itself in a short period of time if you have an ongoing need.
What you need...
*
Cat 5 cable - you can buy a 1000 feet roll of Cat 5 cable at computer stores and industry supply houses for somewhere between 6 and 10 cents a foot, depending on the quality. Don't be cheap, get the decent quality stuff. You don't want to end up with network problems due to bad cables. Check to make sure that the color-coding on the wires is easily recognizable.
Also pay attention to the difference between solid and stranded wire cable. Solid wire cable means that each one of the 8 wires inside the cable consists of one solid copper alloy wire. Solid wire cable is usually used for wiring inside walls as it does not flex very easily and is intended for wires that will never move. It has better conductivity than stranded cable, which means you can run ethernet over farther distances with solid core.
Stranded wire cable means that each one of the 8 wires inside the cable consists of a few dozen very fine hair-like strands that bend and flex very easily. Stranded wire cable is usually used for making patch cables because of its flexibility (the wires won't break as easily from being moved around and twisted frequently).

RJ-45 connectors - They usually come in bags of 50, 100 etc. and cost less than a quarter each. Pay attention to the type of RJ-45 connector you get and make sure it is intended for the type of Cat5 wire you're using. There are two different kind of RJ-45 connectors, depending on whether you use them with solid or stranded wire cable as mentioned above. Using the wrong kind with the wrong cable will most likely result in a bad connection.

Crimping tool - While this is the expensive part of making your own cables, it's only a one-time startup cost. They run anywhere from 10 to 50 bucks depending on the quality and features. Keep in mind that the crimpers will pay for themselves after you make a few cables. A good crimping tool has a pair of wire cutters built in, as well as a blade to strip insulation. It also might support crimping of other connectors such as RJ-11.

Diagonal Cutter Pliers - You'll need a pair of these to cut the wires in case the crimper doesn't come with a built-in wire cutter.
There are two types of network cables commonly used in PC networks - Straight-through and cross-over.
Cross-over: A cross-over cable is used to connect two computers via their NICs, without using a hub or switch. (Note: You can only connect two computers at one time, connecting three or more will require a hub or switch of some sort).
Straight-through: A straight-through network cable is just what the name implies, a cable that passes data straight through from one end to another. Straight-through cables are used for a variety of connections. (e.g. connecting a computer to a hub or switch, connecting a computer to a cable/ISDN/DSL modem, and linking switches and hubs together.)
Let's start with a straight-through cable and then we'll get fancy with a cross-over cable.
Cutting, Stripping, And Sorting The Wires
Cut a piece of Cat 5 as long as you need. When you cut, remember the old saying: Measure twice, cut once. Make sure the cut on each end is clean and straight.

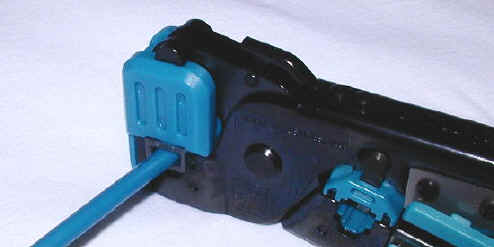
Strip about an inch of the insulation off the cable. Cut it back nice and square. Some crimping tools such as the one used in this article come with a built-in wire stripper. You put the cable in to a stop on one side of the cutter. It will cut the jacket the right length to make a perfect crimp. It is extremely important that you only cut the plastic insulation/jacket and not the wire. Damaging one of the 8 wires, even if you just nick it or partially cut it, will ruin your cable.

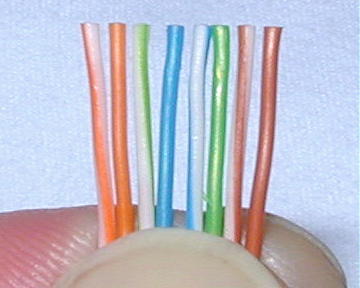
Untwist the wires. You'll notice that there are 4 pairs of multi-colored wires inside. Sort the pairs by color. You should end up with wires color coded as follows: blue/blue-white, orange/orange-white, green/green-white, brown/brown-white.
Note: Some Cat 5 cable skimps on the color-coding and you will have to keep the track of which wire was wrapped around which. If at all possible, check the cable before you buy and make sure the color-coding is easy to recognize. If not, you'll be cursing up a storm later and wish you would have spent the extra 5 bucks on the better cable.

Now align the wires in the following order from left to right. The order is important since there is a wiring standard defined by the Telecommunications Industry Association (TIA) http://www.tiaonline.org. It's called the EIA/TIA-568 Commercial Building Telecommunications Wiring Standard, and you can find more information on it here: http://www.digital-delivery.com/Standards.htm#s5
Get the wires lined up and nice and straight. Then clip off the top millimeter so that they are all the same length and stick out about half an inch from the insulated part.
The best way to insert the cable into the RJ-45 connector is this:
* Hold an RJ-45 connector so that the plastic release clip is facing away from you, and the opening for the wires is pointing down.
* While squeezing the cable so that the jacket does not move on the wires, insert the sorted and aligned wires carefully into the RJ-45 connector partway. You'll feel some resistance as the wires enter the grooves in the connector.
* Looking at the side of the connector that's facing you (should be the one without the clip), verify that the wires are still in the correct order. Sometimes the act of pushing the wires into the connector can cause the order of the wires to be switched at the last moment. Use a magnifying glass if needed.
* Push the wires the remaining way into the connector. Make sure that the wires have gone all the way into the connector and are touching the end of the RJ-45 connector. You should see a line of 8 bare wire ends. If one is missing and that individual wire hasn't gone far enough into the connector, pull the wires out, line up the ends and put them in again. You can't see this problem from the side - you can only see it from the end.
* Now push the jacket as far as it will go into the connector.
Getting all of the wires lined up and inserted correctly can be a little tricky, so take your time. This gets easier as you get the feel of it.
If everything went well, it should look like this:
Right:


See how the end of the insulation sits snug inside the RJ-45, and how the wires go all the way to the end?
Below are two examples how it should NOT look. In the example on the left the wires were left too long, which leaves wires unprotected between the RJ-45 and the insulation. In the example on the right, the wires were cut too short and now don't reach far enough to make contact.
Wrong!


Double-check one last time that the wires are aligned correctly and all the way in. Then insert the RJ-45 connector into the appropriate opening of the crimping tool. Give the handle a nice, tight squeeze without crushing the RJ-45. If you have purchased a pair of ratchet type crimpers you will know that you are done when they release. If you bought a cheap-o pair, check to make sure that all of the little metal contacts are even and at the same height below the plastic of the plug.
Now repeat this entire procedure to put an RJ-45 plug on the other end of the cable. Use the exact same wiring scheme as on the first end, which will make it a straight-through cable.
Note: If you decided to spend a couple extra bucks on the strain relief sleeves, be sure to put them on and facing the correct direction before you crimp the second end.
If you decide to buy it in the store, you'll pay a premium price for the convenience, but if you only need 2 or three cables and don't foresee the need for more in the near future, or need a lot of cables right away and don't have the time to make them yourself, then this is probably the way to go.
If you decide to make your own Cat 5 cable, you'll save a lot of money in the long run, as buying rolls of cable, a baggie of RJ-45 connectors, and the necessary tools will be a lot cheaper and pay for itself in a short period of time if you have an ongoing need.
What you need...
*
Cat 5 cable - you can buy a 1000 feet roll of Cat 5 cable at computer stores and industry supply houses for somewhere between 6 and 10 cents a foot, depending on the quality. Don't be cheap, get the decent quality stuff. You don't want to end up with network problems due to bad cables. Check to make sure that the color-coding on the wires is easily recognizable.
Also pay attention to the difference between solid and stranded wire cable. Solid wire cable means that each one of the 8 wires inside the cable consists of one solid copper alloy wire. Solid wire cable is usually used for wiring inside walls as it does not flex very easily and is intended for wires that will never move. It has better conductivity than stranded cable, which means you can run ethernet over farther distances with solid core.
Stranded wire cable means that each one of the 8 wires inside the cable consists of a few dozen very fine hair-like strands that bend and flex very easily. Stranded wire cable is usually used for making patch cables because of its flexibility (the wires won't break as easily from being moved around and twisted frequently).
RJ-45 connectors - They usually come in bags of 50, 100 etc. and cost less than a quarter each. Pay attention to the type of RJ-45 connector you get and make sure it is intended for the type of Cat5 wire you're using. There are two different kind of RJ-45 connectors, depending on whether you use them with solid or stranded wire cable as mentioned above. Using the wrong kind with the wrong cable will most likely result in a bad connection.
Crimping tool - While this is the expensive part of making your own cables, it's only a one-time startup cost. They run anywhere from 10 to 50 bucks depending on the quality and features. Keep in mind that the crimpers will pay for themselves after you make a few cables. A good crimping tool has a pair of wire cutters built in, as well as a blade to strip insulation. It also might support crimping of other connectors such as RJ-11.
Diagonal Cutter Pliers - You'll need a pair of these to cut the wires in case the crimper doesn't come with a built-in wire cutter.
There are two types of network cables commonly used in PC networks - Straight-through and cross-over.
Cross-over: A cross-over cable is used to connect two computers via their NICs, without using a hub or switch. (Note: You can only connect two computers at one time, connecting three or more will require a hub or switch of some sort).
Straight-through: A straight-through network cable is just what the name implies, a cable that passes data straight through from one end to another. Straight-through cables are used for a variety of connections. (e.g. connecting a computer to a hub or switch, connecting a computer to a cable/ISDN/DSL modem, and linking switches and hubs together.)
Let's start with a straight-through cable and then we'll get fancy with a cross-over cable.
Cutting, Stripping, And Sorting The Wires
Cut a piece of Cat 5 as long as you need. When you cut, remember the old saying: Measure twice, cut once. Make sure the cut on each end is clean and straight.
Strip about an inch of the insulation off the cable. Cut it back nice and square. Some crimping tools such as the one used in this article come with a built-in wire stripper. You put the cable in to a stop on one side of the cutter. It will cut the jacket the right length to make a perfect crimp. It is extremely important that you only cut the plastic insulation/jacket and not the wire. Damaging one of the 8 wires, even if you just nick it or partially cut it, will ruin your cable.
Untwist the wires. You'll notice that there are 4 pairs of multi-colored wires inside. Sort the pairs by color. You should end up with wires color coded as follows: blue/blue-white, orange/orange-white, green/green-white, brown/brown-white.
Note: Some Cat 5 cable skimps on the color-coding and you will have to keep the track of which wire was wrapped around which. If at all possible, check the cable before you buy and make sure the color-coding is easy to recognize. If not, you'll be cursing up a storm later and wish you would have spent the extra 5 bucks on the better cable.
Now align the wires in the following order from left to right. The order is important since there is a wiring standard defined by the Telecommunications Industry Association (TIA) http://www.tiaonline.org. It's called the EIA/TIA-568 Commercial Building Telecommunications Wiring Standard, and you can find more information on it here: http://www.digital-delivery.com/Standards.htm#s5
Get the wires lined up and nice and straight. Then clip off the top millimeter so that they are all the same length and stick out about half an inch from the insulated part.
The best way to insert the cable into the RJ-45 connector is this:
* Hold an RJ-45 connector so that the plastic release clip is facing away from you, and the opening for the wires is pointing down.
* While squeezing the cable so that the jacket does not move on the wires, insert the sorted and aligned wires carefully into the RJ-45 connector partway. You'll feel some resistance as the wires enter the grooves in the connector.
* Looking at the side of the connector that's facing you (should be the one without the clip), verify that the wires are still in the correct order. Sometimes the act of pushing the wires into the connector can cause the order of the wires to be switched at the last moment. Use a magnifying glass if needed.
* Push the wires the remaining way into the connector. Make sure that the wires have gone all the way into the connector and are touching the end of the RJ-45 connector. You should see a line of 8 bare wire ends. If one is missing and that individual wire hasn't gone far enough into the connector, pull the wires out, line up the ends and put them in again. You can't see this problem from the side - you can only see it from the end.
* Now push the jacket as far as it will go into the connector.
Getting all of the wires lined up and inserted correctly can be a little tricky, so take your time. This gets easier as you get the feel of it.
If everything went well, it should look like this:
Right:
See how the end of the insulation sits snug inside the RJ-45, and how the wires go all the way to the end?
Below are two examples how it should NOT look. In the example on the left the wires were left too long, which leaves wires unprotected between the RJ-45 and the insulation. In the example on the right, the wires were cut too short and now don't reach far enough to make contact.
Wrong!
Double-check one last time that the wires are aligned correctly and all the way in. Then insert the RJ-45 connector into the appropriate opening of the crimping tool. Give the handle a nice, tight squeeze without crushing the RJ-45. If you have purchased a pair of ratchet type crimpers you will know that you are done when they release. If you bought a cheap-o pair, check to make sure that all of the little metal contacts are even and at the same height below the plastic of the plug.
Now repeat this entire procedure to put an RJ-45 plug on the other end of the cable. Use the exact same wiring scheme as on the first end, which will make it a straight-through cable.
Note: If you decided to spend a couple extra bucks on the strain relief sleeves, be sure to put them on and facing the correct direction before you crimp the second end.

somindradilruk- Posts : 177
Join date : 2008-10-17
Location : Stockton-on-Tees -

![]()
![]()
![]()
Page 1 of 1
Permissions in this forum:
You cannot reply to topics in this forum|
|
|
» RE-ENROLMENT
» Beyond this world
» Best Moves Ever
» What Does 256 Cores Look Like?
» New CEO of Microsoft
» What Happened to IPv5?
» Classful Addressing
» Bouncing Balls